Python tricks
Widgets
Progress bar in Python
pip install tqdm
Then in the script:
from tqdm import tqdm

for i in tqdm(range(100), desc="Loading..."):
    # ...
If the description needed to be updated at each iteration:
from tqdm import tqdm

for i in (pdar := tqdm(range(100))):
   pdar.set_description('...')
   # ...
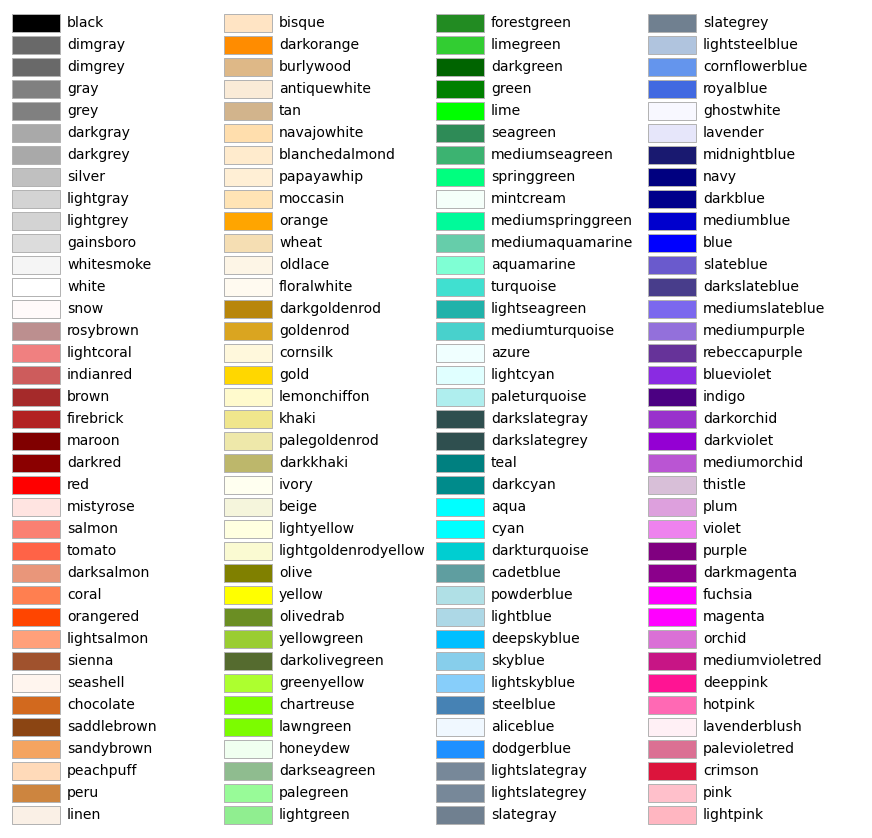
Matplotlib colors
List of named colors — Matplotlib 3.9.2 documentation

My preferred ones:
- goldenrod
- teal
- olive
- lightcoral
Environment
See also:
Export conda environment.yml
Exporting the environment.yml file | conda 25.3.2.dev62 documentation
conda env export > environment.yml
Creating an environment with commands | conda 25.3.2.dev62 documentation
conda env create -f environment.yml
Or just add packages to an existed environment:
conda env update -f environment.yml
.env file
Install dependency:
pip install python-dotenv
Create .env file:
<key1>='<value1>'
<key2>='<value2>'
Load it from Python:
import os
from dotenv import load_dotenv

load_dotenv('.env')
value1 = os.getenv("key1")
value2 = os.getenv("key2")
Don’t forget to ignore the .env in .gitignore:
.env
Jupyter notebook
Add folder to Python path
import sys
sys.path.append('<path>')
P.S. In Jupyter Notebook, if you’d like to change the executing directory directly, you can use:
%cd <path>
Change IPython/Jupyter notebook working directory - Stack Overflow
Reload package in Jupyter Notebook
By adding this cell to the notebook, package can be automatically reloaded. That’s incredibly important when we are developing & testing a package on the go:
%reload_ext autoreload
%autoreload 2
P.S. It reloads every imported package before running each cell, which may slow down the execution time.
python - How to make VSCode auto-reload external *.py modules? - Stack Overflow
A package can also be reloaded manually:
import importlib
importlib.reload(<pkg>)
Auto refresh imports (support %autoreload magic) · Issue #4555 · microsoft/vscode-jupyter
Run Jupyter Notebook from terminal
python - How to run an .ipynb Jupyter Notebook from terminal? - Stack Overflow
Running notebooks from command line have two use cases:
- Scripting notebook runs.
- Avoid having to restarting the kernel when you edit the imported packages.
pip install nbconvert
Then:
jupyter nbconvert --execute --to notebook --inplace <notebook>
To make it easier to type:
alias nbx="jupyter nbconvert --execute --to notebook --inplace"
nbx <notebook>
P.S. It can be accompanied by command line arguments, e.g.:
owner=Knpob nbx convert-alipay.ipynb
Then in the notebooks:
import os

try:
    owner = os.environ['owner']
except:
    pass
Git ignore Jupyter Notebook outputs
- Add a filter to git config by running the following command in bash inside the repo:
git config filter.strip-notebook-output.clean 'jupyter nbconvert --ClearOutputPreprocessor.enabled=True --to=notebook --stdin --stdout --log-level=ERROR'
- Create a
.gitattributesfile inside the directory with the notebooks. Add *.ipynb filter=strip-notebook-outputto that file:
cd <notebook folder>
touch .gitattributes
echo '*.ipynb filter=strip-notebook-output' > .gitattributes
- After that, commit to git as usual. The notebook output will be stripped out in git commits, but it will remain unchanged locally.
This gist is based on @dirkjot's answer.
How to clear Jupyter Notebook's output in all cells from the Linux terminal? - Stack Overflow
Release to PyPI
Building and Publishing - Python Packaging User Guide
Publishing package distribution releases using GitHub Actions CI/CD workflows - Python Packaging User Guide
Prepare
pip install twine build
Setup pyproject.toml
# local install: pip install -e .
# local build: python -m build

[build-system]
requires = ["setuptools>=61.0"]
build-backend = "setuptools.build_meta"

[project]
name = "<pkg>"
version = "<ver>"
description = "<str>"
readme = { file = "README.md", content-type = "text/markdown" }
requires-python = ">=3.7"
license = { text = "<license>" }
authors = [
  { name = "<name>", email = "<email>" }
]
dependencies = [
  "<pkg1>",
  "<pkg2>",
]

[project.urls]
Repository = "<repo link>"
# You can also add more links, e.g. Homepage, Documentation, Bug Tracker, etc.

[tool.setuptools.packages.find]
where = ["."]
include = ["<pkg folder>*"]
P.S. The pyproject.toml can also be used for local install:
pip install -e .
Build & check
Firstly, to avoid including unnecessary or even sensitive files, e.g. you API keys in .env files, clone the project to other places. In that folder, build the project:
python -m build
Check:
twine check dist/*
Upload
If you want to further confirm the release is OK, firstly upload it to TestPyPi:
twine upload --repository-url https://test.pypi.org/legacy/ dist/*
When you're ready, upload it to PyPI:
twine upload --repository-url dist/*
P.S. You need to signup an account and acquire the API key on both PyPI and TestPyPI, separately.
Cleanup
Clear the dist/ folder:
rm -rf dist/


